Showing posts with label technique. Show all posts

Tuesday, July 31, 2007

A Lifeline is a Lace Knitter's Best Friend

A lifeline is a length of yarn, threaded through live stitches in a work in progress, and then left in place to act as a sort of base point in the unfortunate event that the work must be ripped back.


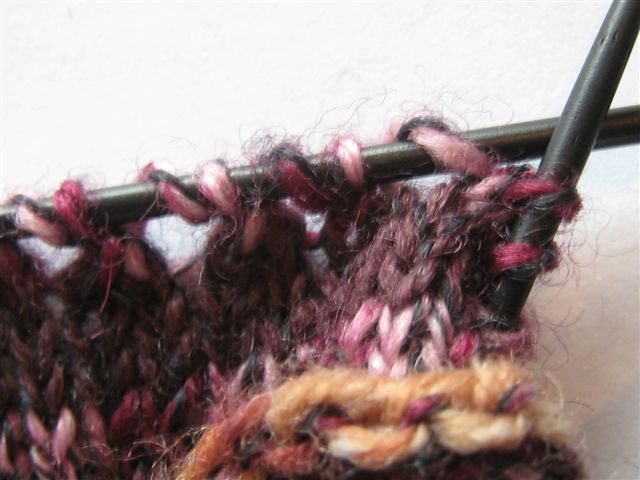
I use them extensively when designing, as you can see in this picture of the shawl I am working on. When I want to try out a new section of lace, I place a lifeline. Then, if I'm not happy with my design choice, I simply slide the work off the needles and rip back with abandon until I come to the stitches held securely in place along the lifeline. This length of yarn, always a different color and preferably a smooth cotton, locks the row of stitches in place, and prevents the work from unraveling further than I would like.

This tool is particularly handy for lace knitting, as the blend of yarn overs and decreases makes picking up a row of live stitches tricky to say the least. However, I recommend it for any type of knitting that would be a hassle to take back or would be heart breaking to unravel too far.


For the lifeline to work properly, care must be taken to thread the scrap yarn through EVERY stitch on the needles. Notice in the picture that I am avoiding running the yarn through my stitch marker.


Once the lifeline is through every stitch, (and I should say here that you would only put the lifeline in after checking that the work knit to that point is error free and the stitch count is correct, etc) make a note of what row the lifeline is running through, so that if you do have to rip back, you'll immediately know what row is next!

Now, press onward with the confidence that comes from knowing if you make a mistake and feel compelled to tear it out, you can rip fearlessly and with abandon because you'll stop at the row of YOUR choosing, and all your correctly knit stitches will be laid out nicely and in order along the length of your lifeline, just waiting to be slipped back onto your needles!

So, cut a couple lengths of leftover cotton yarn, tuck them in your gadget bag with a tapestry needle, and knit, knit, knit!

Yours in knitting,

Claire

Tuesday, July 03, 2007

Achieving a Loose Bind-Off

Bind-offs have a tendency to be too tight, even for those of us loose knitters who have to go down (a minimum of) two needle sizes in order to get gauge. Maybe it's knowing that the goal of the bind-off is to keep all those precious stitches from unraveling, or maybe it's just a by-product of the exuberance one feels knowing the end of a project is just a row away. But regardless of the reason, most of us are guilty of it at one time or another, and a tight bind-off can just plain RUIN a beautifully knitted garment. This is particularly true of socks, and especially true of lace.


I just blocked a draft of the triangular shawl I'm designing for a class this fall. Here, I've pinned it into shape and left it to dry. This is a lace weight blend of 50% silk and 50% wool, worked on a US3 needle, and blocking will grow it by about 50%. (That needle size, by the way, is for the elusive average knitter. I being perpetually & hopelessly loose, had to use a 1...)


If I had bound off tightly, I could never have gotten the edges to stretch wide enough to accommodate the beautiful openwork of the lace.


The bind-off that I chose here is nicely loose and elastic enough to allow the edges to stretch. Notice the edge between the two T-pins: it lies flat and the stitches are big enough to allow the yarn overs along the edge to open as widely and nicely as the yarn overs throughout the rest of the sample. The bind-off I used is the "Decrease Bind-Off" and it is one of my favorites.

It can be worked as either knit stitches or purl stitches. Each method will give a pretty, decorative, nicely stretchy edge.

For the knit bind-off: *K2tog, slip the newly formed knit stitch from the right needle back to the left needle; repeat from * to end.

For the purl bind-off: *P2tog, slip the newly formed purl stitch from the right needle back to the left needle; repeat from * to end.

In both cases, loosen the newly formed stitch as you slip it back to the left needle, and resist the urge to tighten it up again when you work the decrease.

The decrease bind-off, in either form, is frequently recommended for lace knitting, so much so that it is also known as the "Lace Bind-Off". It is also particularly nice in ribbing.

When working any bind-off, the looser you are able to work it, the prettier and more elastic it will be. One tip that works well for me when using the basic chain bind-off (where you work 2 stitches then pull the 1st stitch over the 2nd stitch and off the needle) is to use a needle 2 or 3 sizes larger in diameter than the needles used for the rest of project. Give that a try and see if it loosens things a bit for you too!

Yours in knitting,
Claire

Tuesday, April 17, 2007

Update on Welted Seams

I did hear back from Berroco regarding the term "welted seam". Another knitter who had the same question posted Berroco's reply in a comment to my original entry. (I imagine they get this question ALOT!)

Basically, it refers not to a type of seaming but to the look of the seam. You sew the pieces together using a method that results in the seam showing on the public side of the work. Any method...

You could do the mattress stitch with the wrong sides facing; or do an overcast or whip stitch while holding the wrong sides together.

Yours in knitting,
Claire

Saturday, April 14, 2007

George's Miters

Miters are way cool to knit.

They're one of those fantastically cooperative projects: the pattern is easy to memorize and really quite interesting from an engineering point of view; it takes no time at all to whip out a square; each square requires such a minimal amount of yarn it's easy to haul around in a pocket or purse; mixing colors is a blast; and I could go on and on and ON about how great this is and how glad I am that Shirani suggested it for George, because what little boy with a name like that WOULDN'T want the coolest, funkiest, non-baby-like blanket ever knitted...

And so, I was making some real headway on this project - I meant it when I said these take no time at all... then it was suggested (by a really sensible knitter friend) that I might want to do a little seaming along the way rather than wait till the end. So,


I hung out at Cultured Purl yesterday and mattress stitched some miters!!!


and it looks REALLY REALLY COOL!!! and I thought, wow this is really gonna work, and I had that satisfying feeling of accomplishment when the miters actually met in the middle and it's straight seaming for the most part and so what if I skipped the blocking step and the edges are a little curly...


then....


I turned it over and was


just


about


struck down in a dead faint,


when I realized,,,


the back looks like:


This many (FREAKIN) ends times about a zillion to get the blanket to a respectable size.......OHMYGOD.........


Then Shirani, calmly, and with common sense beyond her years, came up with obvious solution of lining the thing with flannel...Thank God I stopped by the shop today!!

So, it's back to mitering for me....

Yours in lots and lots and lots of cool little squares,

Claire

Friday, April 13, 2007

Welted Seams

A customer was in the shop today asking for some help with a Berroco pattern that calls for a "welted seam". For a picture of the seam, click HERE. Well Sue and I were at a complete loss...

I came home and did a little Internet sleuthing, but there is not a byte of info to be had on "welted seams". If I had to make an educated guess, I'd say it's pretty darn close to an overcast stitch done on the right side. But not quite...if I could just put my hands on my copy of Mary Thomas' charming and fact filled knitting reference...but it's not, for some inexplicable reason (that only my messy house faeries know), with my other 10,000 knitting books...

so - I called the company. It turns out that Berroco has a pattern hotline!! The voice mail message promises someone will respond to my inquiry within 48 hours. I will let you know. In the meantime,if YOU have any thoughts, we'd love to know!!

Yours in knitting,
Claire

Thursday, April 12, 2007

Eye of Partridge

When I ran into Linda at the yarn shop yesterday, she showed me some of her recently knit socks done up in Socks that Rock Yarn. (Linda actually knits with the yarn she buys as opposed to those of us who just hoard it...)

anyway...she had THE coolest looking heel, the Eye of Partridge. She got it from the Harlot's Knitting Rules book, however I googled it and found about 100,000 hits. Essentially, it is just like the heel stitch (where you slip every other stitch on the knit side) except that every other knit row is offset one stitch. There is a very nice picture and chart here The end result is a sort of an all over basketweave look versus the vertical columns of the heel stitch.

What I really want to do is drop all my other projects and start on a pair of socks featuring this heel...but I am going to do the responsible thing and finish something already started (and maybe clean up the laundry room.)

Give it a try and let me know what you think!

Yours in knitting,
Claire

Friday, February 23, 2007

A nicely elastic cast-on for SOCKS...

If you've stopped by Cultured Purl lately (any given day in the mornings) then you've likely seen me fiendishly working on socks because, well, that's what I do now: fiendishly knit socks....I wonder sometimes when I pause to tend to the blister on my index finger, constantly rubbed raw in my effort to obtain the correct tension on my size 0 needles [I can't find any 00 in the wood I like, hence the near death grip I need to use to get 28 sts/4] or when I need to forage for more Ibuprofen to relieve the sort of tennis-elbow-like pain I've developed from rushing through the 30,000 sts it takes to make a pair of man's socks. OhmyGod where was I going with this sentence... Oh yes, I've been wondering when something moves from a hobby to an addiction and then finally on to an obsession. I am going to say instead that I have been "exploring a new interest" in hand knitted socks...

Rather than admit to an obsession, I will say that, as a knitting instructor, it's important that I completely understand every aspect of the craft so that knitters do, in fact, learn something when they take one of my classes.(Yes, a rather lofty goal, given the centuries of knitting knowledge out there, but it's good to aim high!!) Anyway, that line of thinking is what makes me feel less guilty when asked (by seemingly every member of my family of late) WHY I am carrying my knitting bag with me EVERYWHERE. There are times, such as driving in the dark to wait outside in the dark for 2 minutes or less for my daughter's dance class to let out, for example, when I know there is no conceivable way I will get so much as a row done, but it's somehow soothing just to have the sock-in-progress nearby....(alright, I'll admit this is sounding a bit obsessive-like...) That line of thinking also helps when those other nagging responsibilities, like laundry, dinner, laundry, errands, and laundry, cross my mind. Pursuing expertise in turning a perfect heel somehow seems more important. That line of thinking (finally she gets to the point at hand...) is what has led me to discover what sock-knitters of old have praised for eons before me: the German Twisted Cast-On.

Similar to the popular Long Tail Cast-On, and also apparently known as the Old Norwegian Cast-On, the German Twisted Cast-On is quick, extremely elastic, and very attractive as the beginning to a ribbed cuff-down sock.

If you know the Long-Tail method, you're more than half way there as the techniques are very similar. The difference is that, instead of beginning the stitch by bringing the needle through the loop on the thumb, from front to back, the needle is brought down under and behind BOTH strands of the thumb loop and then forward through the loop from BACK TO FRONT. For an excellent tutorial, CLICK HERE This cast-on method creates a prettier, more elastic edge than the regular long-tail, making it a very good option for socks. Check out the tutorial, and give it a try!

Yours in knitting
Claire

Monday, November 27, 2006

How to make a picot hem

I've decided to use a picot hem for the cuff of the ankle socks I am working currently working on. It's a very pretty, feminine edge that gives a lovely look to an otherwise ordinary pair of girl's socks.

It begins with a provisional cast-on: a temporary cast on using contrasting waste yarn which is eventually removed to reveal live stitches. The method I normally use, a crocheted cast on, does not work well with knitting in the round on double pointed needles because the waste yarn is only easily removed from the opposite direction, so I ended up having to cut out the temporary edge. (just a wee bit stressful, so I DON'T recommend it!!) You'll find instructions for several different provisional cast-ons here. There is also an excellent instructional video here.

Once you've cast on the appropriate number of stitches and divided them evenly on your double points, you'll want to knit several rows. The exact number of rows depends on how long you want your cuff to be. I knit 8 rows.

Next, comes the actual picot row. It is simply: yo, k2tog, repeated across one round.


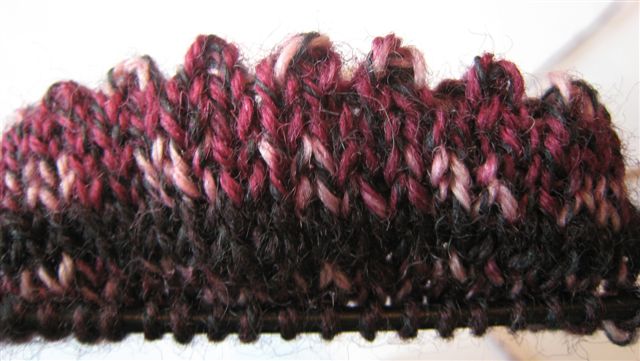
In this photo, you can see the picot row with the holes made by the yarnovers. Once this round is completed, then knit the same number of rows you knit before the picot round.

Now here's the tricky part. You have to fold the cast-on edge inside the double pointed needles to form a hem. The cuff will naturally want to fold along the picot row which is what will give the cuff its pretty picot trim. I spent about 30 minutes on this next part. I'd recommend maybe pouring yourself a glass of wine and finding a comfortable chair in a quiet part of the house where you won't be disturbed...


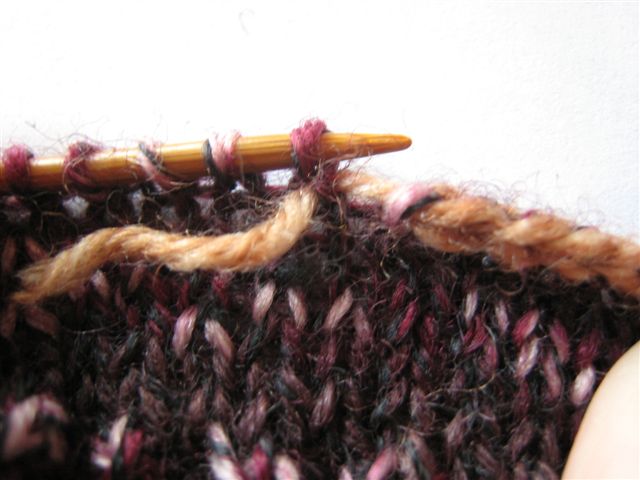
Carefully remove the waste yarn to reveal live stitches. I unraveled one needle's worth of stitches at a time and slipped them onto a spare needle. Here in this photo, you can see my waste yarn was tan and my spare needle was blond. Then, holding the spare needle behind your working needle, knit a row, picking up one stitch from your working needle and one from the spare needle and knitting them together as one stitch.

After you've gone an entire round, all the cast on stitches will have been picked up with the working stitches and the cuff will be double thick and folded at the pretty picot edge!!


If you do decide to give this a try on a sock in place of a normal ribbed cuff, reduce the number of stitches cast on. Ribbing has a natural tendency to tighten making it an ideal elastic band. Picot/stockinette does not, and the cuff will be too loose if worked over the same number of stitches. Try casting on 20% less, and increase evenly on the first round after the cuff band to get back to the correct number of stitches.

If my ankle socks turn out nice, and people are interested, we might put together an intermediate sock class for the winter schedule. I promise the pattern won't be this wordy!!

Give it a try,
yours in knitting,
Claire